
In my last 2 posts (Part 1 and Part 2), I outlined the steps to setup Hive tables (on HDFS) and described how to configure Flume to receive Twitter posts and store it in the Hive tables.
In the last part of this series, I will cover the details on the analytical portion of the Twitter sentiment analysis by explaining how the basic sentiment analysis work and how to write the PySpark file to do the processing.
In this tutorial, we will use Twitter feeds to determine the sentiment of each of the different candidates in the 2016 US Election.
Lets start!
Brief Discussion on Sentiment Analysis
There are many different methods and approaches to sentiment analysis. Here we cover only the most basic approaches to sentiment analysis. However, nothing prevents you from adopting a more sophisticated approach using NLP and other tools. The following diagram illustrates the approach taken in this how-to.
The sentiment figures will be a rough gauge of how positive or negative the tweets are about the subject. There are several key simplifications taken in the interest of time that you may want to explore further to improve the accuracy of sentiment analysis:
- Retweets are considered as “having the same sentiment” – obviously, this may not be true but it would simplify the way tweets are processed
- The presence of the subject will “take on” the sentiment of the tweet. This means that if Samsung S7 is mentioned in the tweet, the sentiment of the tweet is attributed to “Samsung S7”. Obviously, in order to be more accurate, we would need to do entity-name resolution, sentence parsing and aspect based sentiment analysis. But to stay on focus on this tutorial, we will not be covering these topics (perhaps in a subsequent post)
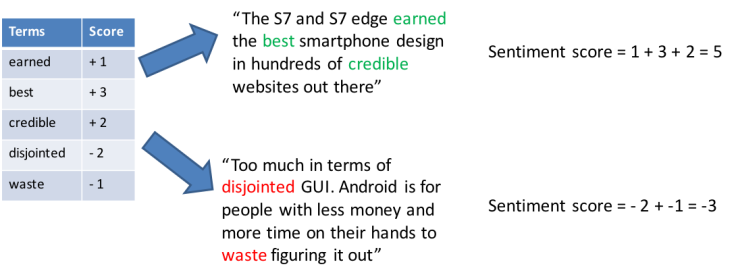
- Sarcasm and word inflexions are not taken into account and may lead to the following incorrect sentiment scoring as shown below:

Nonetheless, this is not to say we cannot do sentiment analysis – but rather to highlight on the difficulties in getting the right sentiment – which will not be address in this tutorial.
Introduction to PySpark
It has been several years since the introduction of Hadoop and Spark and for a while there was some confusion in their roles as Big Data engineering tools. However, in recent times, their role as supporting components rather than competing products has been widely accepted. Nontheless, I am sharing some definitions of what Spark is from multiple sources which I found useful to highlight the key capabilities / purposes of Spark:
- Apache Spark provides programmers with an application programming interfacecentered on a data structure called the resilient distributed dataset (RDD) (https://en.wikipedia.org/wiki/Apache_Spark)
- Apache Spark is a lightning-fast cluster computing technology, designed for fast computation. It is based on Hadoop MapReduce and it extends the MapReduce model to efficiently use it for more types of computations, which includes interactive queries and stream processing. The main feature of Spark is its in-memory cluster computing that increases the processing speed of an application. (https://www.tutorialspoint.com/apache_spark/apache_spark_introduction.htm)
The components of Spark are as shown below and we will be mainly using SparkSQL and PySpark.

To find out more about Spark you can refer to the following: http://spark.apache.org/docs/latest/index.html
PySpark
Spark is written in Scala and Spark applications during compilation are translated into Java bytecode for execution by the JVM. However, the open source community has developed a toolkit to allow users to write programs in Python (which will still compile down to Java bytecode) called PySpark.
I recommend that you read through the following to understand what you will be coding in the following sections
Twitter Message and Candidate Attribution
To simplify this tutorial, how we determine if a tweet is to be attributed to a candidate / subject is by referencing the candidate / subjects handle. For example:
- Tweet #1
- @realDonaldTrump Great piece on Trump’s support of Law enforcement – https://t.co/CREVahlzxb
- Tweet #2
- @realDonaldTrump wining, lying, Donald Trump, does not make a president
- Tweet #3
- @Colonel_Ted: Even if @realDonaldTrump picked @tedcruz (MY fave) for VP I can NEVER in good conscience vote for this megalomaniac. https…
In the tweets above, we will identify the various named entities by their handles @realDonaldTrump, @Colonel_Ted, @tedcruz. Hence the sentiment for the tweet will be attributed to the entities referenced by their Twitter handles.
So in the example above, the sentiment for tweets #1 and #2 will be attributed to Donald Trump, while tweet #3 will be attributed to Donald Trump AND Ted Cruz
As we are taking a very simplistic approach to sentiment attribution, we can use this approach. However, for a more accurate sentiment analysis, I would strongly recommend to do NLP, ENR and aspect based sentiment analysis.
Sentiment Analysis Code
The following steps outline the approach in determining the sentiments of the tweets.
Step 1: Create a simple mapping to label the tweet name. Because different candidates will be referenced in the tweet differently we would need to map each candidate name to the different names they are referred by.
Step 2: Create a dictionary of sentiment words and its associated scores. This will be used to calculate the overall sentiment score of the tweet.
Step 3: For each tweet, calculate the sentiment score and total the score for each candidate
Copy the following code into a file “SentimentAnalysis.py” and save it on the ./SentimentAnalysis folder (refer to Tutorial 1 for the folder location)
#!/usr/bin/env python
#
# Licensed to the Apache Software Foundation (ASF) under one or more
# contributor license agreements.  See the NOTICE file distributed with
# this work for additional information regarding copyright ownership.
# The ASF licenses this file to You under the Apache License, Version 2.0
# (the "License"); you may not use this file except in compliance with
# the License.  You may obtain a copy of the License at
#
#    http://www.apache.org/licenses/LICENSE-2.0
#
# Unless required by applicable law or agreed to in writing, software
# distributed under the License is distributed on an "AS IS" BASIS,
# WITHOUT WARRANTIES OR CONDITIONS OF ANY KIND, either express or implied.
# See the License for the specific language governing permissions and
# limitations under the License.
#
# Code to score tweets using AFINN and to generate a set of sentiment score for each person mentioned.
#   usage: ./bin/pyspark SentimentAnalysis.py
#

"""SentimentAnalysis.py"""

import math
import re
import sys

from StringIO import StringIO
from datetime import datetime
from collections import namedtuple
from operator import add, itemgetter

# Note - SparkContext available as sc, HiveContext available as sqlCtx.
from pyspark import SparkContext
from pyspark import HiveContext
from pyspark.streaming import StreamingContext

sc = SparkContext(appName="PythonSentimentAnalysis")
sqlCtx = HiveContext(sc)

# Read in the word-sentiment list and create a static RDD from it
filenameAFINN = "/home/training/TwitterSentimentAnalysis/AFINN/AFINN-111.txt"

# map applies the lambda function (create a tuple of word and sentiment score) to every item of iterable
# within [ ] and returns a list of results. The dictionary is used here to be able to quickly lookup the
# sentiment score based on the key value
afinn = dict(map(lambda (w, s): (w, int(s)), [ ws.strip().split('\t') for ws in open(filenameAFINN) ]))

# Read in the candidate mapping list and create a static dictionary from it
filenameCandidate = "file:///home/training/TwitterSentimentAnalysis/Candidates/Candidate Mapping.txt"

# map applies the lambda function
candidates = sc.textFile(filenameCandidate).map(lambda x: (x.strip().split(",")[0],x.strip().split(","))) \
				  	   .flatMapValues(lambda x:x).map(lambda y: (y[1],y[0])).distinct()

# word splitter pattern
pattern_split = re.compile(r"\W+")

# use sqlCtx to query the HIVE table
tweets = sqlCtx.sql("select id, text, entities.user_mentions.name from incremental_tweets")

#this python function will calculate the sentiment score of the entire tweet
def sentiment(text):
 words = pattern_split.split(text.lower())
 sentiments = map(lambda word: afinn.get(word, 0), words)
 if sentiments:
  sentiment = float(sum(sentiments))/math.sqrt(len(sentiments))
  #sentiment = float(sum(sentiments))
 else:
  sentiment = 0
 return sentiment

sentimentTuple = tweets.rdd.map(lambda r: [r.id, r.text, r.name]) \
			   .map(lambda r: [sentiment(r[1]),r[2]]) \
			   .flatMapValues(lambda x: x) \
			   .map(lambda y: (y[1],y[0])) \
			   .reduceByKey(lambda x, y: x+y) \
			   .sortByKey(ascending=True)

scoreDF = sentimentTuple.join(candidates) \
			.map(lambda (x,y): (y[1],y[0])) \
			.reduceByKey(lambda a,b: a+b) \
			.toDF()

scoreRenameDF = scoreDF.withColumnRenamed("_1","Candidate").withColumnRenamed("_2","Score")

sqlCtx.registerDataFrameAsTable(scoreRenameDF, "SCORE_TEMP")

sqlCtx.sql("INSERT OVERWRITE TABLE candidate_score SELECT Candidate, Score FROM SCORE_TEMP")
The statements above are self-explanatory but I will take some time to discuss the key statements in this entire script as follows:
sentimentTuple = tweets.rdd.map(lambda r: [r.id, r.text, r.name]) \
			   .map(lambda r: [sentiment(r[1]),r[2]]) \
			   .flatMapValues(lambda x: x) \
			   .map(lambda y: (y[1],y[0])) \
			   .reduceByKey(lambda x, y: x+y) \
			   .sortByKey(ascending=True)

scoreDF = sentimentTuple.join(candidates) \
			.map(lambda (x,y): (y[1],y[0])) \
			.reduceByKey(lambda a,b: a+b) \
			.toDF()
The following describes what each line in the above statement is doing.
sentimentTuple = tweets.rdd.map(lambda r: [r.id, r.text, r.name])
The result set from the query of tweets is referenced as a Resilient Data Set (.rdd) and then the lambda function is applied to all the rows in the RDD using the map method. The “map” method can be thought of as the “map” in “map-reduce”.
Note that the lambda function takes in a row of the RDD (in parameter r) and we create a list of 3-tuples (r.id, r.text, r.name)
[724232069421768704, u”@LewisHShupe I’m tired of being penalized for not having #Obamacare because I can’t afford it/ @BarackObama is a #POS #terrorist #TrumpTrain”, [u’Lewis Shupe’, u’Barack Obama’]]
| r.id | r.text | r.name |
| 724232069421768704 | “@LewisHShupe I’m tired of being penalized for not having #Obamacare because I can’t afford it/ @BarackObama is a #POS #terrorist #TrumpTrain | Lewis Shupe, Barack Obama |
.map(lambda r: [sentiment(r[1]),r[2]]) \
With the list of 3-tuples, we again apply the lambda function on each row (now a 3-tuple) that calls the sentiment function earlier defined and returns a 2-tuple – sentiment score and r.text (r[2])
[1.0425720702853738, [u'Hillary Clinton']],
[-0.47140452079103173, [u'RTina']],
[-0.4082482904638631, [u'Lewis Shupe', u'Barack Obama']],
[-1.3093073414159544, [u'CJLB', u'Ted Cruz', u'Jim Hoft']]
| sentiment(r[1]) | r[2] |
| 1.0425720702853738 | Hillary Clinton |
| -0.47140452079103173 | RTina |
| -0.4082482904638631 | Lewis Shupe, Barack Obama |
| -1.3093073414159544 | CJLB, Ted Cruz, Jim Hoft |
.flatMapValues(lambda x: x) \
With the 2-tuple dataset, we apply a flatMapValues function to flatten out the structure within r[2]. This will make it easier to process in the subsequent steps
(1.0425720702853738, u'Hillary Clinton'), (-0.47140452079103173, u'RTina'), (0.0, u'Halli Casser-Jayne'), (0.0, u'Yvonne Slee '), (0.0, u'Raymond W Clarke'), (-1.3093073414159544, u'CJLB'), (-1.3093073414159544, u'Ted Cruz'), (-1.3093073414159544, u'Jim Hoft')
| sentiment(r[1]) | r[2] |
| 1.0425720702853738 | Hillary Clinton |
| -0.47140452079103173 | RTina |
| -0.4082482904638631 | Lewis Shupe |
| -0.4082482904638631 | Barack Obama |
| -1.3093073414159544 | CJLB |
| -1.3093073414159544 | Ted Cruz |
| -1.3093073414159544 | Jim Hoft |
.map(lambda y: (y[1],y[0])) \
This is a simple step to swap the fields so that the first column is the name and the second is the sentiment score
| y[1] | y[0] |
| Hillary Clinton | 1.0425720702853738 |
| RTina | -0.47140452079103173 |
| Lewis Shupe | -0.4082482904638631 |
| Barack Obama | -0.4082482904638631 |
| CJLB | -1.3093073414159544 |
| Ted Cruz | -1.3093073414159544 |
| Jim Hoft | -1.3093073414159544 |
.reduceByKey(lambda x, y: x+y) \
The reduceByKey is a function where the values of the 2-tuples are added together. By default the first column in the data set will be the key – hence this statement will add all the y[0] having the same key value in y[1]. The result of summing each name found in the entire set of tweets is as shown below (first 6 only, not sorted in any order)
(u'Ava Guthrie', -1.6329931618554523)
(u'K Kelly', 0.0)
(u'AUBURN FAN 4 RUBIO', -0.6255432421712244)
(u'Royal Jordanian', 0.47140452079103173)
(u'JOEY MANNARINO', 6.4236405483757295)
(u'Jimmy Kimmel', -0.75)
.sortByKey(ascending=True)
Finally the sortByKey method will sort the 2-tuple RDD in ascending order by name. In the sample extract below, the first 10 2-tuples sorted by name is as shown below:
(u'#$@%&+?', 0.47140452079103173)
(u'#1 Road Warrior Fan', 0.0)
(u'#4thewin', 0.8121063121025829)
(u'#Alwaystrump', -1.4278802916547295)
(u'#AngryMajorityNY', 1.6417736995057388)
(u'#BERNIEFACTS', 0.20062843367526345)
(u'#BLACKS FOR TRUMP!!!', 0.0)
(u'#BargainingChip', 0.4364357804719848)
(u'#BlackLivesMatter-LA', 0.0)
(u'#Chemtrails', -0.5345224838248488)
scoreDF = sentimentTuple.join(candidates) \
			.map(lambda (x,y): (y[1],y[0])) \
			.reduceByKey(lambda a,b: a+b) \
			.toDF()
The last step would be to do a left join with the candidates dataframe so that only the 2-tuple sentiment scores for the candidate names we are interested in will be returned and we then sum them up by the mapped name before returning the final sentiment score.
Row(_1=u’Hillary Clinton’, _2=2.508604778151232)
Row(_1=u’Donald Trump’, _2=76.03149029470246)
Row(_1=u’Ted Cruz’, _2=162.63942375987867)
Row(_1=u’Bernie Sanders’, _2=-10.372575217548247)
Copy Supporting Files
Ensure that the following are in the same folder as the “SentimentAnalysis.py” file.
- AFINN folder with AFINN-96.txt, AFINN-111.txt and AFINN-README.txt
- Candidates folder with Candidate Mapping.txt
- hive-site.xml
The folder should look like the one below:

Running the PySpark Script
Before running the SentimentAnalysis.py script, ensure that you are at the /TwitterAnalysis/ folder.

You should eventually see the Spark job complete and you can then navigate back to the Hive Editor and execute the query:
select * from candidate_score to view the results of the Spark job.

Finally, you can then use your favorite visualization tool to plot the results.
Possible Errors Encountered
During the execution of the Python script you may encounter the following error:
Py4JJavaError: An error occurred while calling o44.sql.
: java.lang.RuntimeException: java.lang.RuntimeException: Unable to instantiate org.apache.hadoop.hive.ql.metadata.SessionHiveMetaStoreClient
......
Caused by: java.lang.RuntimeException: Unable to instantiate org.apache.hadoop.hive.ql.metadata.SessionHiveMetaStoreClient
……
Caused by: javax.jdo.JDOFatalInternalException: Error creating transactional connection factory
NestedThrowables:
java.lang.reflect.InvocationTargetException
This could be caused by a missing hive-site.xml file in the /TwitterAnalysis/ folder or when running the script you are not running from /TwitterAnalysis/.
Resolution:
- http://stackoverflow.com/questions/15810210/unable-to-instantiate-hivemetastoreclient
- http://stackoverflow.com/questions/35449274/java-lang-runtimeexception-unable-to-instantiate-org-apache-hadoop-hive-ql-meta
- http://stackoverflow.com/questions/28695444/apache-hive-unable-to-instantiate-org-apache-hadoop-hive-metastore-hivemetasto
Final Words
I hope you have found the 3-part tutorial helpful in understanding Hadoop, Hive, Flume, Spark and PySpark. Here are some of my afterthoughts
Observations
- Cloudera VM is preloaded with older versions of Spark and HIVE
- Further configuration required to ensure SparkSQL works on HIVE files. Additional libraries and configuration filed required
- Flume configuration is a non-trival activity and needs to find the correct libraries for Twitter integration (apache vs cloudera)
Further Architecture Improvements
- HIVE on HDFS performance can be improved though partitioning by date – this will allow us to query the sentiment and compare across dates easier.
- Consider using Impala (however needs to explore the configuration setup required, libraries, config files)
- Move to Spark Streaming directly ingesting from HIVE to stream processing of the sentiment scoring (currently using batch processing)
- HIVE supports ACID since 0.13 however, there is performance impact due to transaction management. Hence need to put in place workflow (e.g. Oozie) to process inbound messages in staging and move processed messages to processed table instead of transactional updates.
Further Analytic Improvements
- Use StandfordNLP and Python NLTP to do entity based sentiment analysis. This would provide a more accuract sentiment scoring for each candidate
- Plot and track sentiment scoring across time period to understand how each candidate is being view from the social media space

I followed the same steps but while running the SentimentAnalysis.py, i got following warning:
WARN metastore.ObjectStore: Failed to get database default, returning NoSuchObjectException
Due to which the tables are missing.
pyspark.sql.utils.AnalysisException: no such table incremental_tweets; line 1 pos 50
I have checked the Hive, tables are already there.
LikeLike
Check that you can query the table over Hive and try to insert a dummy record in to the table in Hive. I should probably be an issue with the Hive setup.
LikeLike
I followed the same steps, but while running the SentimentAnalysis.py, I got the following error:
File “”, line 1, in
File “/usr/lib/spark/python/pyspark/sql/context.py”, line 528, in sql
return DataFrame(self._ssql_ctx.sql(sqlQuery), self)
File “/usr/lib/spark/python/lib/py4j-0.8.2.1-src.zip/py4j/java_gateway.py”, line 538, in __call__
File “/usr/lib/spark/python/lib/py4j-0.8.2.1-src.zip/py4j/protocol.py”, line 300, in get_return_value
py4j.protocol.Py4JJavaError: An error occurred while calling o53.sql.
org.apache.spark.sql.AnalysisException: Non-local session path expected to be non-null;
I would appreciate any help.
LikeLike